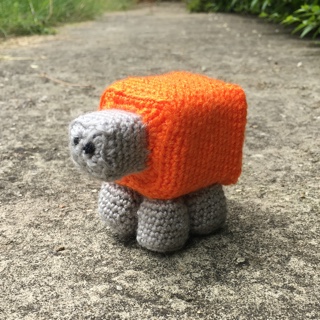
Through my work with my local Makerspace I have met a wonderful woman called Michelle. She is the moderator of a large Facebook group called Asperger’s Adventures - Minecraft and Meltdowns, a social group which acts as a support of Autism families. It has grown so much in the last couple of years that she now organises an annual event specifically catering for children with Autism and their families, which our Makerspace attends with our 3D printers and toys in tow. I went last year and took my crochet with me. Next thing I knew, I am hard at work crocheting their mascot named Meep Sheep.
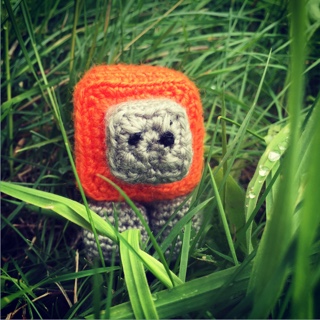
Meep Sheep is based on the sheep from Minecraft, he is a square shape and is bright orange to stand out in a flock of white. He looks the other way from the sheep because he feels different (but not any less!)
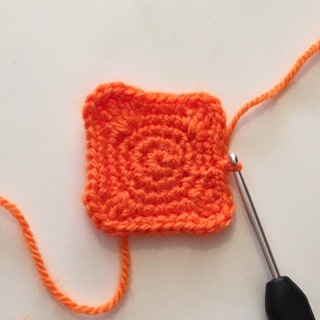
I had a look around for patterns for cube and cuboid amigurumi and arrived at a distinct group of stitches which give a defined corner in the flat piece of crochet. By grouping a double crochet, treble and double treble together in one stitch, followed by a treble and double crochet in the next stitch you get a nice right angle suitable for making a square. The technique is a little tricky, but with practice it comes out lovely!

So here is the pattern for him, he’s completely free to make but if you’re thinking of selling him please contact me as I’d prefer for the profits from his sales go into the Minecraft & Meltdowns group. I also sell him (not-for-profit), so if you can’t crochet you can still buy one at my Etsy store.

Free Pattern: Meep Sheep
Pattern Notes
Each cuboid is made in two parts. Part one starts as a flat square, you then work in the back loops only (BLO) around the edge to help grow the square from a flat shape to a cubiod with one flat square and four vertical sides. Part two is a second flat square which you then stitch onto part one to make a closed 3D shape.
While amigurumi is usually made in continuous rounds, because of the nature of the cuboid shape this is made in joined rounds. This means each round begins with a ch1 and ends with a sl st join. This keeps the corners of the cuboid well defined.
Crochet terms
This pattern is written in British crochet terms. Here’s what the abbreviations mean with US terms alongside.
| Term | UK term | US terms |
|---|---|---|
| BLO | work in the Back Loops Only | back loops only |
| dc | double crochet | single crochet |
| dtr | double treble crochet | treble crochet |
| ch1 | chain 1 | chain 1 |
| sl st | slip stitch | slip stitch |
| tr | treble crochet | double crochet |
Materials
Orange & grey acrylic yarn, craft foam sheet, toy stuffing, a small weight (eg a coin), black embroidery thread, and a hook one size smaller than you’d usually use.
Amigurumi is worked tightly to make sure no holes appear in the crocheted fabric. This usually means you need to use a hook one size smaller than recommended by the yarn label. EG if you use double knit like I have, you will use a 3mm hook.
Head Part 1 (grey)
- Work 8 dc into a magic ring, sl st join (8)
- ch1 and 2dc into same stitch, *2 dc in the next stitch* repeat from * to * to the end of the round, sl st join (16)
- ch1 and dc into same stitch, *dc, 2 dc in the next stitch, dc, dc* repeat around, sl st join (20)
- ch1 and dc into same stitch, * dc, dc then tr then dtr in same stitch, tr then dc in same stitch, dc, dc * repeat around, sl st join (32)
- Working in the back loops only (BLO), ch1 and dc in same stitch, dc into each stitch around, sl st join (32)
- ch 1 and dc in same stitch, dc in each stitch and slip stitch join (32)
- to 12. ch1 and dc in same stitch, dc in each stitch and slip stitch join. (32) Repeat this round for 6 rounds to give 12 rounds in total.
FO and leave a long tail for sewing.
Head Part 2 (grey)
- Repeat rounds 1 to 4 of Head Part 1. This will give you a flat square which can act as a lid to Part 1.
- Finish off and leave a long tail for sewing.
Re-enforce the Head Part 1 with craft foam, fill with stuffing, top with a square of foam and sew on Head Part 2 like a lid.
Body Part 1 (orange)
-
Work 8 dc into a magic ring, sl st join (8)
-
ch1 and 2dc into same stitch, *2 dc in the next stitch* repeat from * to * to the end of the round, sl st join (16)
-
ch1 and dc into same stitch, *dc, 2 dc in the next stitch, dc, dc* repeat around, sl st join (20)
-
ch1 and dc into same stitch, * dc, dc then tr then dtr in same stitch, tr then dc in same stitch, dc, dc * repeat around, sl st join (32)
-
ch1 and dc in same stitch, dc in the next two stitches, *dc then tr in the next stitch, tr then dc in the next stitch, dc in the next 6 stitches* repeat from * to * twice, dc then tr in the next stitch, tr then dc in the next stitch, dc in the next three stitches, sl st join (40)
-
Working in BLO, ch1 and dc in same stitch, dc into each stitch around, sl st join (40)
-
to 20. ch1 and dc in same stitch, dc in each stitch and slip stitch join. (40) Repeat this round for 14 rounds to give 20 rounds in total.
Finish off and leave a long tail for sewing.
Body Part 2 (orange)
- Repeat rounds 1 to 5 of Body Part 1. This will give you a flat square which can act as a lid to Part 1.
- Finish off and leave a long tail for sewing.
Re-enforce the Body Part 1 with craft foam, add a little weight into the body, fill with stuffing, add a square of foam and sew on Body Part 2 like a lid.
Legs (grey)
Make 4 legs
-
Work 8 dc into a magic ring, sl st join (8)
-
ch 1 and dc into same stitch (counts as the first dc in following group) * dc then tr then dc in the same stitch * repeat around to make 4 corners, sl st join (16)
-
ch1, Working in BLO dc in each dc around, sl st join (16)
-
to 9. ch1, dc in same stitch, dc in each stitch around, sl st join (16)
Finish off and leave a long tail for sewing. Re-enforce each leg with craft foam and then stuff.

Making up Meep Sheep
I usually choose the side of the body with the ridge of joins as the underside. Sew the four legs to the underside of the body, and then sew the head to the front of the body. Sew French knots with embroidery thread for eyes.
Meep Sheep is finished!
If you make one, please tag me in a photo on twitter or Instagram, or by finding the Minecraft & Meltdowns group and uploading it into there. I’d love to see your creation! If you have any questions about the pattern please leave a comment below. I’ve tried my best to keep it readable, but it sometimes got tricky with so many stitches being worked into the corner stitches.